How-To: Develop Components in Python
This guide is a starting point for developing Python-based F Prime applications by constructing select components using Python.
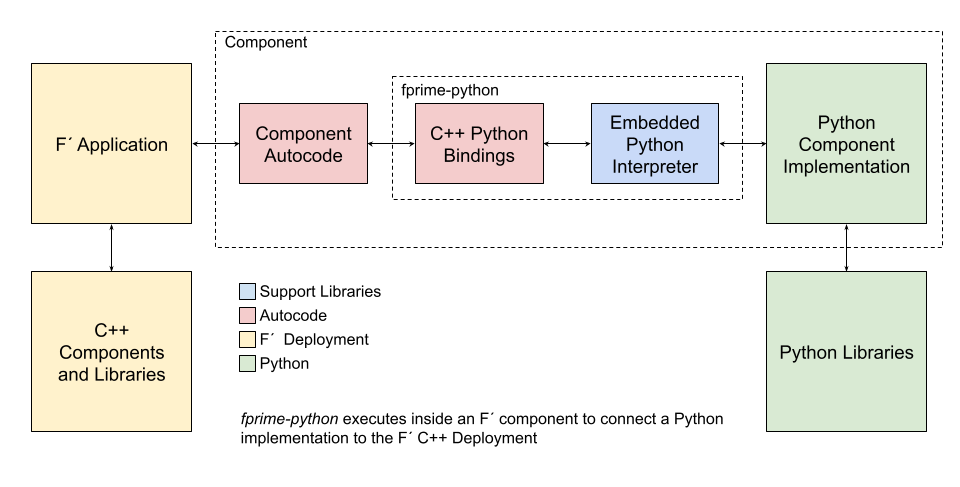
fprime-python exposes F Prime and its standard components as a Python extension. It autocodes bindings to components written withing Python allowing them to be called from the larger system. This allows developers to write components in Python while still leveraging the F Prime framework and its ecosystem of tools and libraries.
For a working reference project, see the F Prime Python Reference.
Contents
- When to Use This
- Prerequisites
- Python in F Prime
- Modeling
- Project Structure
- Development Environment
- Development Workflow
- Testing
- Packaging and Distribution
- Integration with Flight Components
- Debugging
- Next Steps
When to Use This
Use this guide when you are:
- Have existing Python code that you wish to integrate into an F Prime project
- Want to explore F Prime development through Python
- Need to rapidly prototype components or utilities without C++ overhead
Caution
fprime-python is not flight-grade in the traditional sense as Python uses garbage collection. Additionally, Python will introduce runtime overhead. Evaluate with care before electing to use fprime-python on a flight system.
Prerequisites
Before expanding or following this guide, the reader should typically have:
- A working F Prime development environment
- An understanding of how to create F Prime projects using F Prime libraries
- Basic familiarity with FPP and the generated C++ structure
- Working understanding of Python development
Python in F Prime
Python is a powerful language that enables rapid development and has access to a huge number of libraries. Often initial prototypes, vendor code, and deliveries from other teams come in the form of Python scripts, modules, or packages.
fprime-python allows you to integrate Python code into your F Prime project, enabling you to leverage existing Python assets and rapidly develop new components without needing to write C++. It is largely intended for rapid prototyping, proof-of-concept development, and integration in non-critical components in the system.
fprime-python works by providing F Prime's topology and components as a module that can be used in Python. Additionally, bindings from C++ to a Python component are automatically generated allowing F Prime to send port calls to a Python implementation. Modeled types, events, telemetry, and commands are all supported.
The relationship between the stock F Prime autocode, the generated bindings, and the user-supplied Python implementation is shown below.
Project Setup
fprime-python should use a phased deployment for simplicity. When running fprime-util new to create a new deployment, supply the --phased flag.
Projects using F Prime python should include fprime-python as a submodule and list it as an F Prime library in settings.ini.
Typically libraries are added to the lib directory:
Once added, users should install fprime-python into their Python environment.
Tip
This installation can be done in requirements.txt. See the F Prime Python Reference for an example.
Once installed, fprime-util new can be used to create new components once the empty C++ implementations are removed.
Caution
When using fprime-util new to create new fprime-python components, remove the C++ implementation files from disk, and remove from the SOURCES block in the CMakeLists.txt.
Modeling
When creating a component in fprime-python you must annotate the component with @fprime-python on a dedicated line in the component's declaration.
Once annotated, component modeling proceeds as normal. For this guide, we will create a component defining a single command:
@ Demonstration of a Python component by echoing a command string
@fprime-python
active component PythonEchoer {
    @ Command implemented in Python
    async command PYTHON_HELLO(string_argument: string) drop

    @ Event sent from Python
    event HelloEvent(string_argument: string) severity activity high \
        format "A Python says: {}"
}
Tip
An fprime component cookiecutter for fprime-python components is available: https://github.com/LeStarch/fprime-python-component-cookiecutter. fprime-util new --from-source https://github.com/LeStarch/fprime-python-component-cookiecutter
Implementation
Once a component has been modeled with the @fprime-python annotation, build the project to generate a python component template.
Once completed, a
Rename this file to
Example "echo" implementation:
class PythonEchoer(PythonEchoerBase):
    """ Python implementation for the PythonEchoer component """

    def PYTHON_HELLO_cmdHandler(self, opCode, cmdSeq, string_argument):
        """ Handle the PYTHON_HELLO command """
        return_status = fprime_py.Fw.CmdResponse.T.OK
        self.log_ACTIVITY_HI_HelloEvent(string_argument)
        self.cmdResponse_out(opCode, cmdSeq, fprime_py.Fw.CmdResponse(return_status))
Caution
You can use __init__ for construction, however; it should be very basic as the F Prime system hasn't been setup at the time of Python object construction. Do NOT attempt to use any F Prime features in __init__.
Once this is done, add <component>.py to the SOURCES block in the CMakeLists.txt and rebuild the project.
register_fprime_component(
    AUTOCODER_INPUTS
       ${CMAKE_CURRENT_SOURCE_DIR}/PythonEchoer.fpp
    SOURCES
        ${CMAKE_CURRENT_SOURCE_DIR}/PythonEchoer.py
)
Update the model, find new implementation templates in <component>.template.py, and implement as needed.
Binding TopologyState
The TopologyState struct is defined by the developer of a deployment. As such, it cannot automatically be bound to Python, however; it is necessary to construct this state in Python when interacting with the topology.
Thus, we must set up the bindings manually. To do so, add a C++ file to your topology module. For example, TopologyBindings.cpp, and develop the bindings for the topology state struct. These bindings must be placed in a function with the signature void setup_user_deployment(pybind11::module_& m) as this is called by the fprime-python module to set up the deployment bindings. Here is an example:
#include "FprimePython/FprimePython.hpp"
#include "FprimePythonReference/ReferenceDeployment/Top/ReferenceDeploymentTopologyDefs.hpp"

// Function used to bind the deployment into Python
void setup_user_deployment(pybind11::module_& m) {
    // Bind in the topology state type
    // See: https://pybind11.readthedocs.io/en/stable/classes.html
    pybind11::class_<ReferenceDeployment::TopologyState>(m, "TopologyState")
        .def(pybind11::init<>())
         // See: https://pybind11.readthedocs.io/en/stable/classes.html#instance-and-static-fields
        .def_readwrite("hostname", &ReferenceDeployment::TopologyState::hostname)
        .def_readwrite("port", &ReferenceDeployment::TopologyState::port);
}
Note
Here we bind the "hostname" and "port" fields. You should change these bindings to match your deployment's topology state struct.
Instantiation and Deployment Main (Entry Point)
Component instantiation in the topology proceeds as normal. No special considerations are needed.
  instance pythonEchoer: PythonEchoer base id 0x10005000 \
    queue size Default.QUEUE_SIZE \
    stack size Default.STACK_SIZE \
    priority 95
However, the main function for the deployment is now implemented in Python. This means the user is responsible for writing a main setup function. The standard topology functions setup and teardown are automatically bound to Python and can be called from the user-supplied main function.
Users will typically want to do the following in their main function:
- Initialize the OSAL layer with
fprime_py.Os.init() - Call
<deployment>.setup()to set up the topology - Call
<deployment>.teardown()on shutdown
def fsw_main():
    """ Main entry point for the deployment """
    topology_state = fprime_py.TopologyState()
    topology_state.hostname = "127.0.0.1"
    topology_state.port = 50000
    fprime_py.Os.init()
    try:
        fprime_py.ReferenceDeployment.setup(topology_state)
    except KeyboardInterrupt:
        print("[INFO] CTRL-C received, shutting down F Prime")
    except Exception as e:
        print(f"[ERROR] Failed to start F Prime: {e}")
    fprime_py.ReferenceDeployment.teardown(topology_state)
    print("[INFO] F Prime shutdown complete")

if __name__ == "__main__":
    fsw_main()
Tip
The reference deployment provides a complete example of a main function. This uses PythonRateGroupDriver and as such starts the rate groups in python.
Testing
Unit testing for Python components is not yet supported. Testing may use the integration test framework to test at the system level.